Setting up a local server on Windows 10 for WordPress theme development (or any web development for that matter)
With this comprehensive tutorial you will have nginx, PHP 7.3 and MariaDB installed for developing WordPress themes on Windows 10 with WSL(Windows Subsystem for Linux) and Ubuntu 18.04 LTS
I don’t like developing the web on Windows. There, I said it. I only use Windows for entertainment like playing computer games and the like. Doing professional web development on Windows is a pain. I may be in too deep with the macOS and Linux world where everything is one command away. On Windows, everything is with thousands of clicks and tweaks and turns away, it’s like in a developing countries where things are shaping into form and it takes years to get to the point where other systems have already been like ten years ago.
Web development on macOS has always been a breeze because so many developers use unix based bash commands and command line which comes naturally on macOS Terminal. On unix based systems it’s easier to create automation tools with Puppet, Ansible OR be it pure bash scripts (my preferred way) because the commands and infrastructure stays unchanged over the updates to the system.
On Windows the things are, well… different. Unstable. Windows 10 has two built-in command line interfaces, cmd and PowerShell from which neither one supports bash terminal or proper packages out of the box. The command line and development environments tend to be kinda “hacky” on Windows because of the nature of Windows where settings and paths are all over the place. Windows Subsystem for Linux (WSL) tries to solve these problems but it’s all still kinda wonky. Proper automation for Windows is near impossible because there are these quirks you have to always do via GUI like approving Windows Firewall requests, installing stuff from Microsoft Store etc. etc. So it’s kinda hybrid-strategy full of hacks to install something via command line and something graphically. Doable and manageable but different. Hence, this tutorial.
So here’s walkthrough on how to get WordPress development environment up and running successfully on Windows computer.
I’m currently writing this tutorial on a fresh Windows account and writing this steps as I go to make sure everything goes as planned for you as well. I hope it all works out exactly like it did for me! Bear with me!
Step one. Install Windows Subsystem for Linux
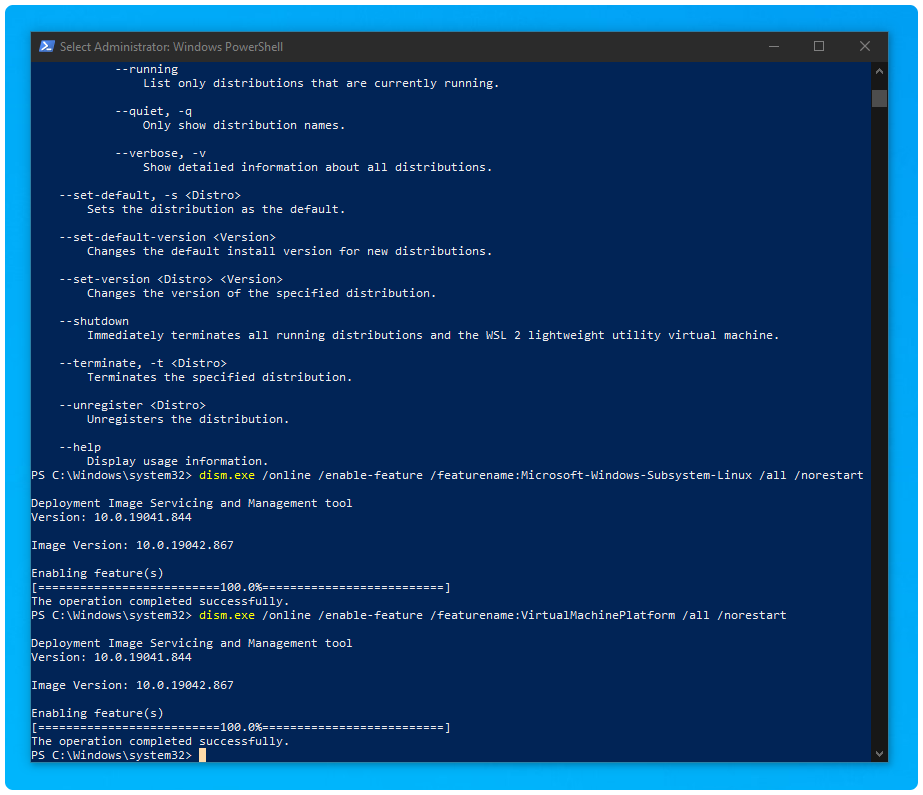
Please note that these instructions are the official Microsoft manual installation instructions dated April 2021 and can be outdated in the future. If so, please follow the instructions on this Windows Subsystem for Linux Installation Guide for Windows 10 instead. To start, run PowerShell as administrators, go to Start menu, type powershell, right click to it and select “Run as administrator”. Run the following command:
dism.exe /online /enable-feature /featurename:Microsoft-Windows-Subsystem-Linux /all /norestartxYou also need to enable virtualization features:
dism.exe /online /enable-feature /featurename:VirtualMachinePlatform /all /norestartBecause of Windows is what it is, you need to re-login or restart your computer after entering these commands.
After these we will upgrade the kernel. Download and install wsl_update_x64.msi. Go back to PowerShell and run:
wsl --set-default-version 2Lastly, install the distribution Ubuntu 18.04 using this link. If you do this via Microsoft Store app directly you may notice all distributions won’t show there. Here’s the complete list just in case. Please note that this tutorial is meant for Ubuntu 18.04 specificially so please install that version to get everything right.
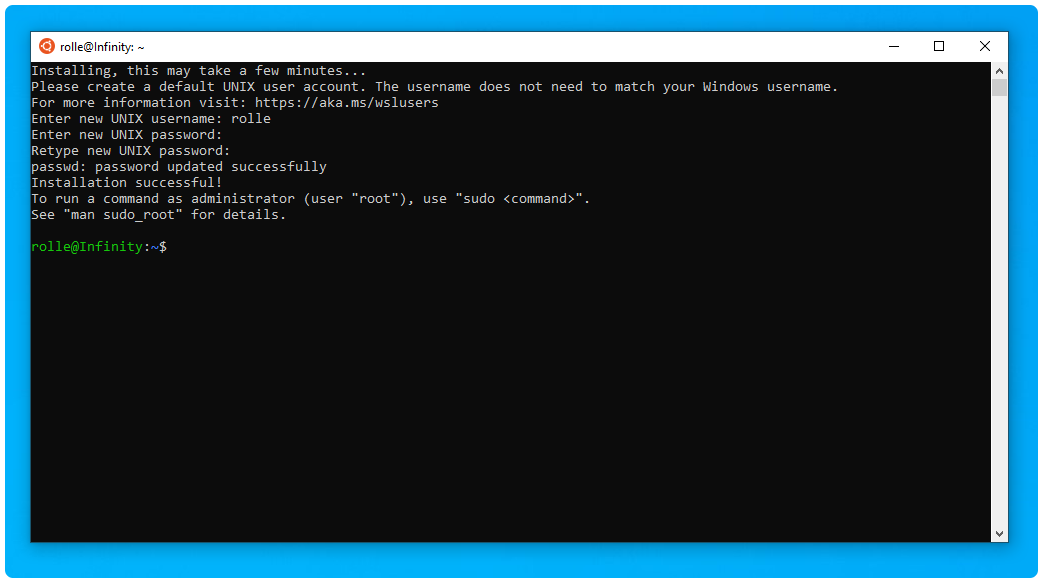
After installing Ubuntu, go to start menu and select Ubuntu 18.04 LTS. It should prompt “Installing, this may take a few minutes…” command line window.
Decide your username and password. Do not forget these. Congratulations! You’ve successfully installed and set up a Linux distribution that is integrated with your Windows operating system!
Step two. Run FluentTerminal and install apt updates.
Let’s ditch the ugly terminals and download latest FluentTerminal. It’s the nicest looking and most functional command line interface app for Windows in my opinion. Go to settings, tweak them as your liking. I really recommend Dracula Theme and SF Mono font and moving tabs to the bottom (I prefer no tabs myself and I have opened a feature request about this).
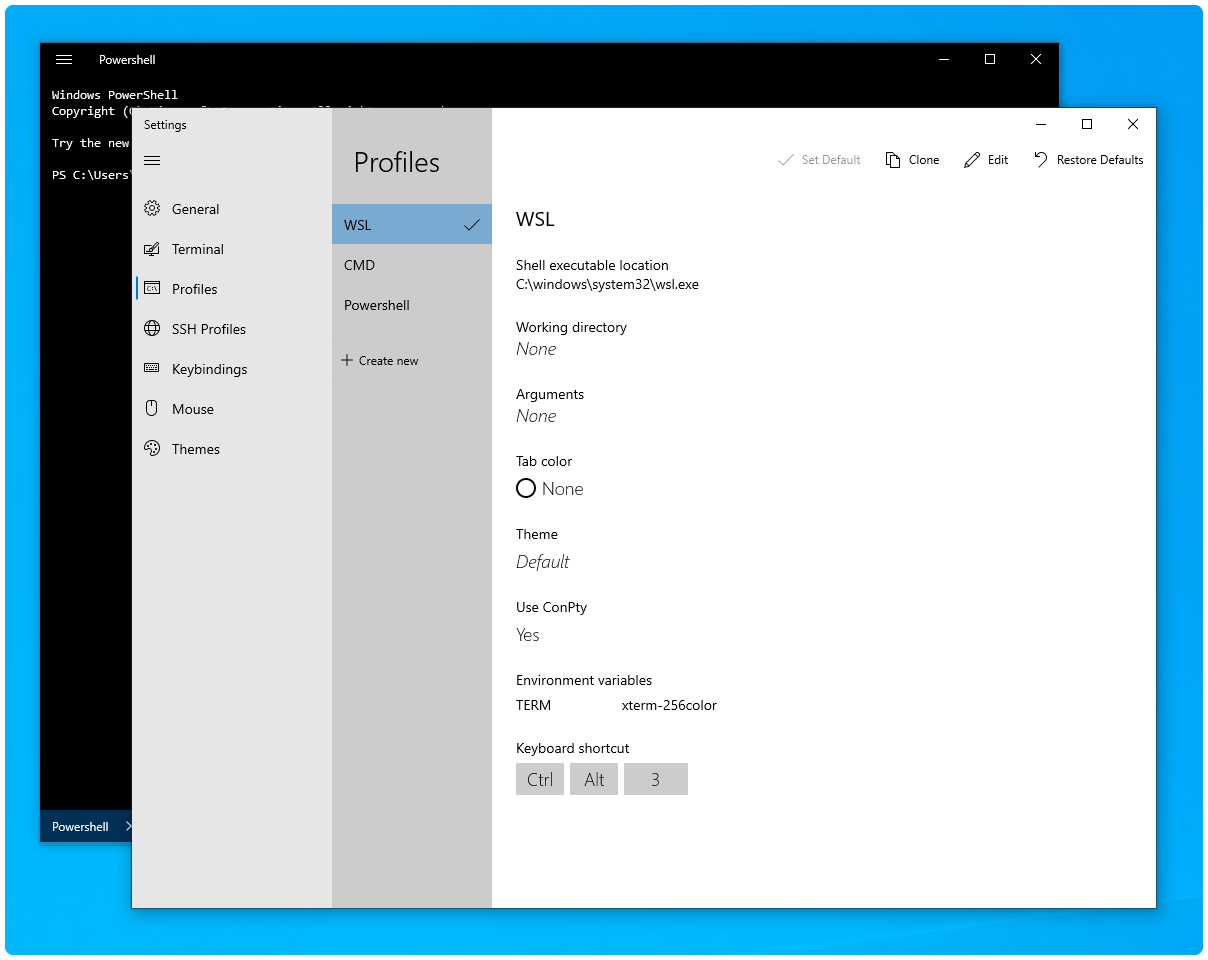
Change Profile to WSL:
After relaunching FluentTerminal we should be now able to run Linux commands like:
sudo apt updatePro tip: Edit /etc/sudoers with nano like this:
sudo nano /etc/sudoersThen add to the bottom pgdn (where rolle is your own username):
rolle ALL=(ALL) NOPASSWD:ALLThis way you don’t need to type root password every time you want to run sudo privileges. Please do this only if you are not on shared computer and you are home safe. Not recommended on any other scenarios.
Step three. Install local development server. Let’s start with nginx.
Now we have WSL but we still can’t open any pages locally. We need a local development server. We could install WAMP or XAMPP but these tend to be too “messy” for my taste and you can’t really control what happens under the hood. For the learning purposes let’s utilize our WSL capabilities and install nginx, php and mysql by hand.
I do have a windows-lemp-setup script that attempts to install everything with one command but it sounds better than it actually is. I have installed windows LEMP with that script three times and every time it didn’t kinda work as excepted and I still needed to do things by hand. So let’s try to set up everything manually this time.
First let’s update all packages if you didn’t do it already (in FluentTerminal copy is ctrl + shift + C and paste ctrl + shift + V, this is because ctrl + C etc. mean different in Linux world):
sudo apt updateNext we’ll install nginx:
sudo apt install -y nginx-fullAfter this we can instantly enable nginx to run on boot:
sudo systemctl enable nginxAnd then we’ll just run it:
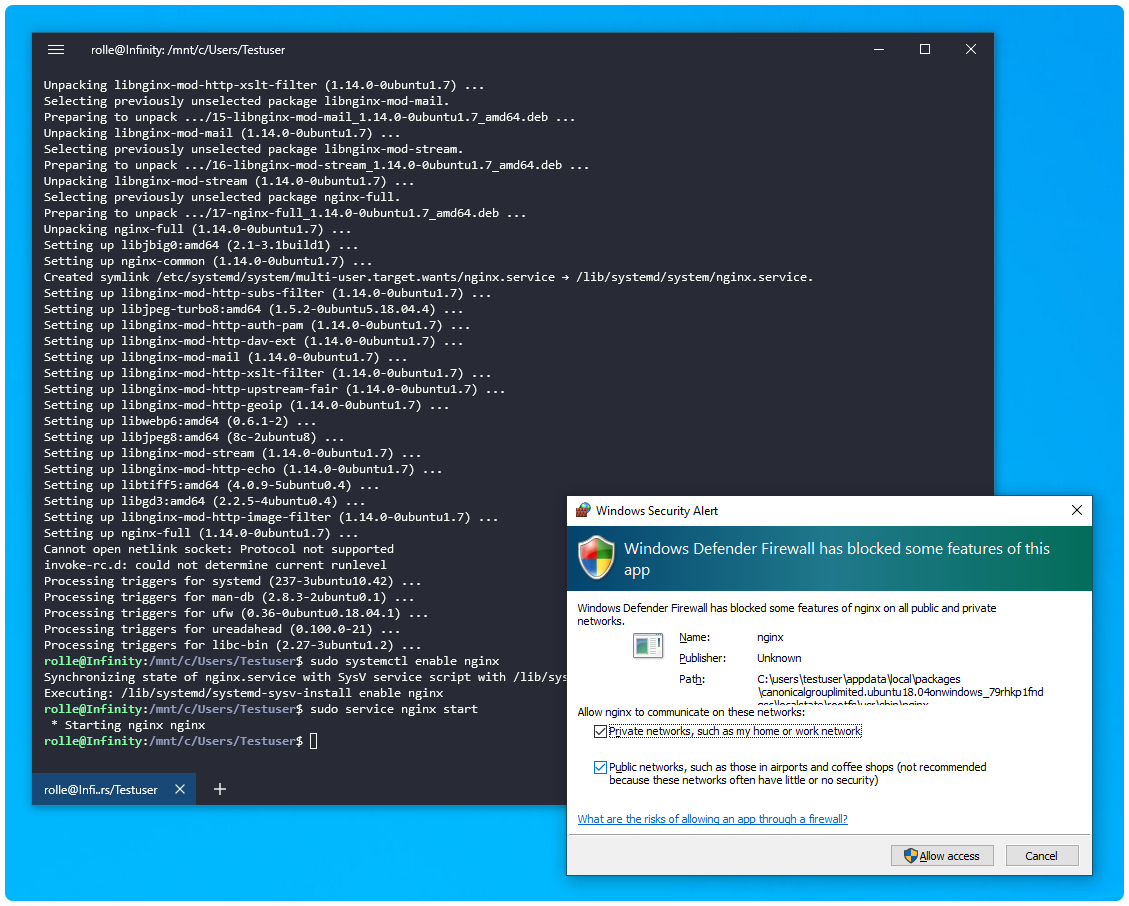
sudo service nginx startOnly Windows things… let’s have Windows Firewall to allow nginx everywhere:
After this you should see the default page on http://127.0.0.1:

This means your web servers is up and running, great job! If you want, you can try to test it out by creating hello.html or something like this:
sudo nano /var/www/html/hello.htmlAdd anything to that file, for example:
<strong style="color: #be2edd;">Hello world!<strong>Save with ctrl + O. Close nano with ctrl + X. Then go to 127.0.0.1/hello.html and you should see what you just created, a “steel pink” purpleish “Hello world!” text if you used the example above.
Okay, HTML based files work fine and nginx is up and running. We are not there yet. Not even close.
Let’s do some configs next. Backup the original nginx.conf:
sudo cp /etc/nginx/nginx.conf /etc/nginx/nginx.conf.bakThen open the file:
sudo nano /etc/nginx/nginx.confPress and hold ctrl + K to remove everything. Then copy following and paste to the command line window with ctrl + shift + V:
user www-data www-data;
worker_processes 8;

events {
  multi_accept on;
  accept_mutex on;
  worker_connections 1024;
}
http {
  sendfile on;
  sendfile_max_chunk 512k;
  tcp_nopush on;
  tcp_nodelay on;
  keepalive_timeout 120;
  keepalive_requests 100000;
  types_hash_max_size 2048;
  server_tokens off;
  client_body_buffer_size 128k;
  client_max_body_size 10m;
  client_header_buffer_size 1k;
  large_client_header_buffers 4 32k;
  output_buffers 1 32k;
  postpone_output 1460;
  server_names_hash_max_size 1024;
  include /etc/nginx/mime.types;
  default_type application/octet-stream;
  access_log off;
  access_log /var/log/nginx/access.log combined;
  error_log /var/log/nginx/error.log;
  include /etc/nginx/sites-enabled/*;
}
Save with ctrl + O. Close nano with ctrl + X. This will add some performance improvements. Restart nginx to get changes in effect:
sudo service nginx restartHowever, we still can’t run WordPress because we don’t have PHP and fastcgi installed on the web server. Let’s set up that next.
Step four. Installing PHP 7.3 and native php-fpm on Windows WSL.
For Ubuntu there’s a separate repository for PHP related packages that are up to date. Let’s add this first:
sudo add-apt-repository -y ppa:ondrej/phpThen we’ll update package list:
sudo apt updateNext install all the PHP packages that WordPress and web server depend on:
sudo apt install -y php7.3-cli php7.3-common php7.3-curl php7.3-fpm php7.3-gd php7.3-imap php7.3-intl php7.3-json php7.3-mbstring php7.3-mysql php7.3-opcache php7.3-pspell php7.3-readline php7.3-recode php7.3-soap php7.3-sqlite3 php7.3-tidy php7.3-xml php7.3-xmlrpc php7.3-xsl php7.3-zip zip unzipThis will take some time. After this we need some more configuring for nginx:
sudo nano /etc/nginx/php7.confCopy and paste these settings to that file:
location ~ \.php$ {
  proxy_intercept_errors on;
  try_files $uri /index.php;
  fastcgi_split_path_info ^(.+\.php)(/.+)$;
  include fastcgi_params;
  fastcgi_read_timeout 300;
  fastcgi_buffer_size 128k;
  fastcgi_buffers 8 128k;
  fastcgi_busy_buffers_size 128k;
  fastcgi_temp_file_write_size 128k;
  fastcgi_index index.php;
  fastcgi_buffering off; # This must be here for WSL as of 11/28/2018
  fastcgi_param SCRIPT_FILENAME $document_root$fastcgi_script_name;
  fastcgi_pass unix:/var/run/php/php7.3-fpm.sock;
}
Save with ctrl + O. Close nano with ctrl + X. We will need some more global settings. Let’s add them to global directory, let’s create it first:
sudo mkdir -p /etc/nginx/globalThen we’ll create another file:
sudo nano /etc/nginx/global/wordpress.confAdd these to that file:
# WordPress single site rules.
# Designed to be included in any server {} block.
# Upstream to abstract backend connection(s) for php
location = /favicon.ico {
  log_not_found off;
  access_log off;
}

location = /robots.txt {
  allow all;
  log_not_found off;
  access_log off;
}

# Add trailing slash to */wp-admin requests.
rewrite /wp-admin\$ \$scheme://\$host\$uri/ permanent;

# Directives to send expires headers and turn off 404 error logging.
location ~* ^.+\.(ogg|ogv|svg|svgz|eot|otf|woff|mp4|ttf|rss|atom|jpg|jpeg|gif|png|ico|zip|tgz|gz|rar|bz2|doc|xls|exe|ppt|tar|mid|midi|wav|bmp|rtf)\$ {
  access_log off;
  log_not_found off;
  expires max;
}
Now we need to create a pool for PHP and virtual host for our PHP files, the kind of host that accepts PHP files. First let’s edit the pool config, open www.conf:
sudo nano /etc/php/7.3/fpm/pool.d/www.confFind (in nano: kbd + W ) and edit the parts that need to change. First search for listen.allowed_clients and uncomment it:
listen.allowed_clients = 127.0.0.1Also uncomment listen.mode:
listen.mode = 0660The most important part is listen, we need it to match the same we have on our nginx config php7.conf we set up earlier. I mean of course this part:
listen = /run/php/php7.3-fpm.sockIn the bottom there’s some settings that start with php_. Search for ;php_admin_value[memory_limit] that should be the last item in the config. Add these after it:
catch_workers_output = yes
php_flag[display_errors] = On
php_admin_value[error_log] = /var/log/fpm7.3-php.www.log
slowlog = /var/log/fpm7.3-php.slow.log
php_admin_flag[log_errors] = On
php_admin_value[memory_limit] = 1024M
request_slowlog_timeout = 10
php_admin_value[upload_max_filesize] = 100M
php_admin_value[post_max_size] = 100M
Save with ctrl + O. Close nano with ctrl + X. Now we can enable php7.3-fpm process to start automatically on boot:
sudo systemctl enable php7.3-fpmNow we can start the process:
sudo service php7.3-fpm startNote: In case of errors you can always check your configurations with native commands nginx -t and php-fpm7.3 -t (it bugs me btw that the command for command line process and testing configuration is php-fpm7.3 but the actual service is php7.3-fpm… this is something that just need to be memorized).
We need to set up full permission for that sock file (otherwise we run up to 502 Bad Gateway and error in /var/log/nginx/error.log: [crit] 13616#13616: *6 connect() to unix:/var/run/php/php7.3-fpm.sock failed (13: Permission denied) while connecting to upstream, client: 127.0.0.1):
sudo chmod -R 777 /var/run/phpWe still don’t have virtual host for PHP pages. Let’s do that next.
Open default vhost with command:
sudo nano /etc/nginx/sites-enabled/defaultPress and hold ctrl + K to remove everything. Then add following to it (this is practically the same than default but without useless comments, this is bare minimum default nginx config with added index.php index and our configurations created earlier):
server {
  listen 80 default_server;
  listen [::]:80 default_server;
  root /var/www/html;
  index index.html index.htm index.nginx-debian.html index.php;
  server_name _;
  include php7.conf;
  include global/wordpress.conf;
}
Save with ctrl + O. Close nano with ctrl + X. And restart nginx:
sudo service nginx restartPHP-FPM (FastCGI Process Manager) is now up and running. Now we have a web server that understands PHP. We just need files to test out with.
We already the default located in /etc/nginx/sites-enabled/default as nginx creates it during the install but it points out to the “Welcome to nginx!” page we don’t have easy access to.
Because Windows Explorer doesn’t know how to handle symlinks properly (it uses its default Windows shortcuts and shows symlinks as 0kb dummy files) we need to reverse this by moving nginx default files to our preferred location and symlink that location to /var/www which WSL understands. We’ll use user directory here because it has all the correct permissions for us to work by default.
Let the moving and linking begin. Edit Testuser in this example to match yours:
sudo mv /var/www /mnt/c/Users/Testuser/ProjectsThen we’ll link Projects back to /var/www:
sudo ln -s /mnt/c/Users/Testuser/Projects /var/wwwNow you should see your files under user C:/Users/Yourusername/Projects in Explorer:
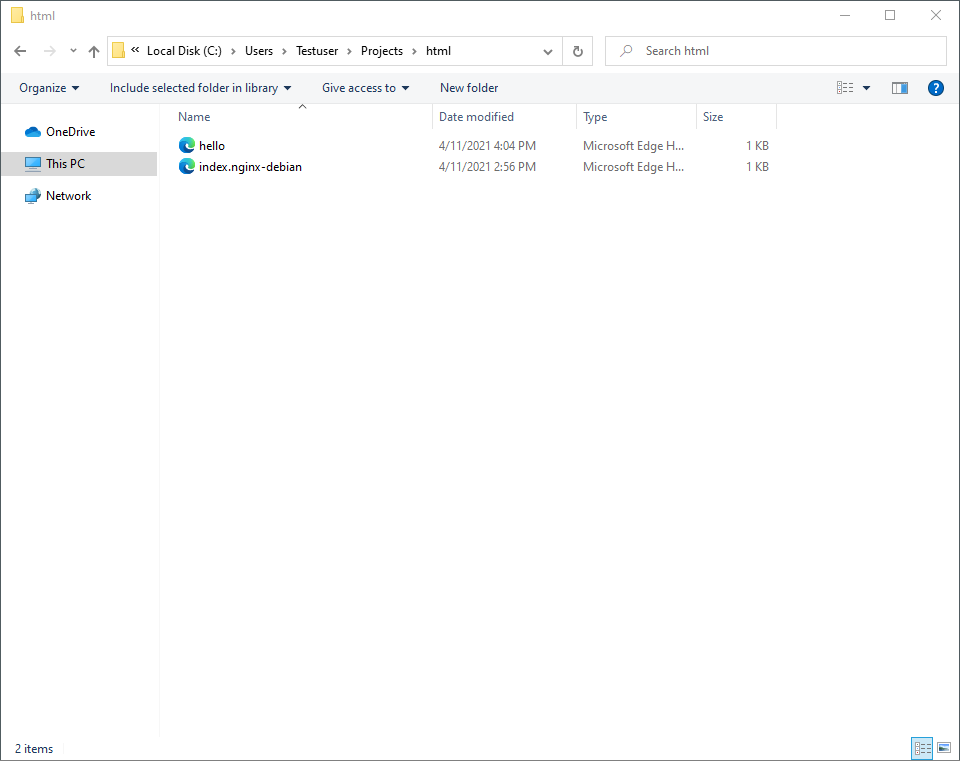
This makes it easier for us to create files and edit them with Visual Studio Code or other editors in the future.
Next let’s test this out. You should always have file extensions visible in Explorer, so make sure you have unticked on Organize → Change folder and search options → View → Hide extensions for known file types → ☐ (untick) → Apply.
Then, create phpinfo.php inside your C:/Users/Yourusername/Projects/html which is the default directory for localhost. Open file in Visual Studio Code or any editor you prefer. At this point while testing Notepad is equally good. Add to file:
<?php phpinfo();Save the file. Open http://127.0.0.1/phpinfo.php in browser and it should display your PHP information like this:

Now we can run bare PHP files on browser. But we still don’t have WordPress. This is because WP needs a MySQL database. So let’s install it next.
Step Five. Installing a MySQL database.
First we need a repository that contains the latest MariaDB. If you wonder what MariadB is, it’s MySQL. Kinda. Development is led by some of the original developers of MySQL, who forked it due to concerns over its acquisition by Oracle Corporation in 2009. You can read more about it in Wikipedia.
Where were we? The packages, yes, these commands are directly from the official MariaDB documentation:
sudo apt-get install software-properties-common
sudo add-apt-repository 'deb [arch=amd64,arm64,ppc64el] http://sfo1.mirrors.digitalocean.com/mariadb/repo/10.3/ubuntu bionic main'
sudo apt update
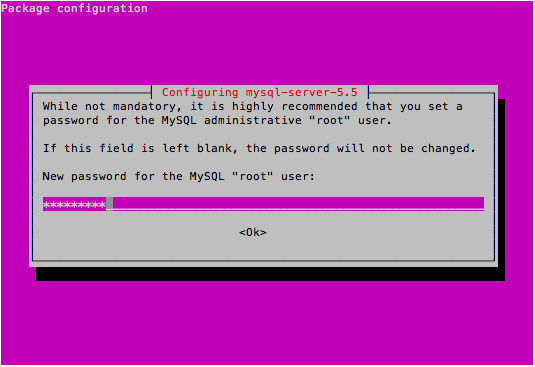
sudo apt install -y mariadb-client libmariadbd-dev mariadb-serverFirst you need to make sure mysql server is running. Some readers of this tutorial have reported that they didn’t get onboarding and are getting ERROR 2002 (HY000): Can’t connect to local MySQL server through socket ‘/var/run/mysqld/mysqld.sock’ (2 “No such file or directory”). In this case you need to run mysql server first. See this issue and this issue. There’s plenty of help under WSL GitHub or MySQL forums if you encounter issues.
Add password for mysql root account if asked in installation. If not, run sudo mysql_secure_installation, but only if you do not get that purple password prompt after apt-get installation command that looks like this. If you need to run mysql_secure_installation, answer n to “Disallow root login remotely? [Y/n]”.
You should have your MySQL root password saved in handy place like your Bitwarden vault.
Now we can enable MariaDB to start MySQL databases on boot:
sudo systemctl enable mariadbAnd then we just start the service:
sudo service mysql startLet’s test out that it actually works. We should be able to log in to the mysql console by simply running:
sudo mysql -u root -pType in the root password you set up previously and you are in if you see a window like this:

You can also test graphical database handling. Windows doesn’t have as brilliant DB app as macOS’ Sequel Pro so we have to go with Adminer. So do this:
cd /var/www/html && wget https://github.com/vrana/adminer/releases/download/v4.8.0/adminer-4.8.0-mysql.phpThen open http://127.0.0.1/adminer-4.8.0-mysql.php and log in with root and your password and you should be able to add, edit, browse, import and export your local databases.

Now you have them all, Linux, nginx [engine x], MySQL and PHP. Now you also know first hand where the acronym LEMP comes from.
Done? Haha, we don’t even have WordPress yet. Let’s move on to the step six.
Step six. Installing a modern WordPress stack dudestack
You could always create a vhost for your website and download a zip from WordPress.org and install everything manually. But that’s a bit cumbersome if you want to develop WordPress with modern packages like composer, npm, gulp and automate things.
I have created a WP stack called dudestack (based on roots/bedrock) back in the days when we started with our digital WordPress agency company Dude. But dudestack is only meant for macOS and doesn’t work on Windows or Linux as it is filled with macOS packaging manager homebrew commands. We have automated commands like createproject which save dozens hours of time when creating new WordPress instances and themes.
For Windows/Linux/WSL I needed to create the new start script for WordPress projects because macOS version didn’t cut it. WSL version has been bundled into dudestack from now on.
First, clone dudestack with git (git should be pre-installed with Ubuntu but if not, install it width sudo apt install git). Ensure you are at your /var/www directory first and then clone:
cd /var/www && git clone https://github.com/digitoimistodude/dudestack.gitIf you get permission problems (error: “chmod on …/config.lock failed: Operation not permitted” and “fatal: could not set ‘core.filemode’ to ‘false’“) in this point you have probably forgot to reboot your computer (I did and had to restart in this point). So reboot your PC completely.
Got it rebooted? Great! I assume git clone command is now fine, we can proceed.
Link wsl.sh to global bin folder so that you are able to run the script with one command in the future:
sudo ln -s /var/www/dudestack/bin/wsl.sh /usr/local/bin/createproject && sudo chmod +x /usr/local/bin/createprojectThen just simply run:
createprojectYou can use testproject for the purpose of this tutorial. Or any name you want. The script will ask you following things:
- Project name (which is also called textdomain in the WordPress world)
- MySQL password you set up earlier (only first time, then it will remember)
- Default WP-admin administrator username (only first time, then it will remember)
- Default WP-admin user password (only first time, then it will remember)
- Default WP-admin user email (only first time, then it will remember)
After this it starts working for you. What it does it:
- Installs git if not present
- Gets latest dudestack and checks for updates
- Installs Composer if not present
- Runs composer create-project with parameters which means that it installs dudestack “boilerplate” for WordPress projects with all sorts of packages like default plugins and WP-CLI for instance
- Creates MySQL database for the project
- Removes README.md, CHANGELOG.md and useless dotfiles for project
- Installs WordPress with your credentials
- Removes default “Hello world” WordPress posts and other default stuff, sets up timezones, permalink structure and other settings you would otherwise do manually by clicking in wp-admin interface
- Sets up SSL certificate for local site
- Sets up nginx virtual host for your site
- Restarts nginx service
…and maybe some other things I may have forget to mention but these are the main things.
After you have got your WordPress installed with createproject you need to then add host for your project as the script says in the end. Windows does not let updating C:/Windows/system32/drivers/etc/hosts file via command line so you have to use HostsFileEditor. Install it via installer, then add 127.0.0.1 testproject.test there like this (where testproject.test if of course your local website url):
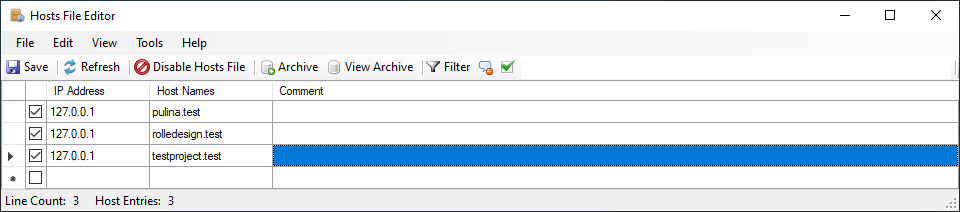
Remember to check the checkbox from list and hit Save! I forgot the checkbox and wondered why my site doesn’t open in browser. After this you can open your website with the urls script gave you. The site (white page because no themes yet) should be at https://testproject.test and admin at https://testproject.test/wp/wp-login.php:

If you forgot your passwords you can check your credentials in ~/.env file. You can also use WP-CLI to update WordPress related settings. It is useful to add alias to wp (command for WP-CLI) since it’s always installed under project in dudestack. The alias looks like this and is to be added to ~/.bashrc file:
alias wp='vendor/wp-cli/wp-cli/bin/wp'After this restart your FluentTerminal or run . ~/.bashrc. Then under your WordPress project you should be able to run things like this:

Now we just need a theme.
Step seven. Creating your next awesome theme on top of a starter theme
This part should be the easiest. First clone Air-light to your Projects directory:
cd /var/www/ && git clone https://github.com/digitoimistodude/air-light.gitStart the theme start script with the command below. This can take a while, get a cup of coffee.
cd air-light/bin
bash newtheme-wsl.sh
Project name is your project name you decided earlier (testproject in this tutorial) and theme name can be anything. Let’s use testtheme if you follow this tutorial by the word. What the script does is:
- Gets latest Air-light
- Checks for git and npm and installs them with all the dependencies
- Sets up file permissions for theme
- Installs npm packages for the theme
- Gets development packages like dotfiles, stylelint, gulpfiles for project and installs them ready to use
- Replaces textdomains with theme name of your choosing
- Cleans up leftover files like readmes and such
- Removes Air demo content
- Creates a directory for media files
- Creates acf-json folder for ACF fields
- Compiles CSS and JS first time
- Adds Air-light base versions etc. to README.md
Answer the question “Do we use comments in this project? (y/n)”. After a while it should say with green text:
“All done! Theme generated. Go to https://testproject.test/wp/wp-admin/themes.php and activate your theme, then run gulp watch in project root and start coding! Your project can be found at /var/www/testproject and your theme can be found at /var/www/testproject/content/themes/testtheme”. Go to the URL and activate theme:

Now you can go to your project directory and ensure all packages are installed and up to date:
cd /var/www/testproject
npm update
npm install
Start developing your theme with simply:
gulpAgain, add Firewall permissions:
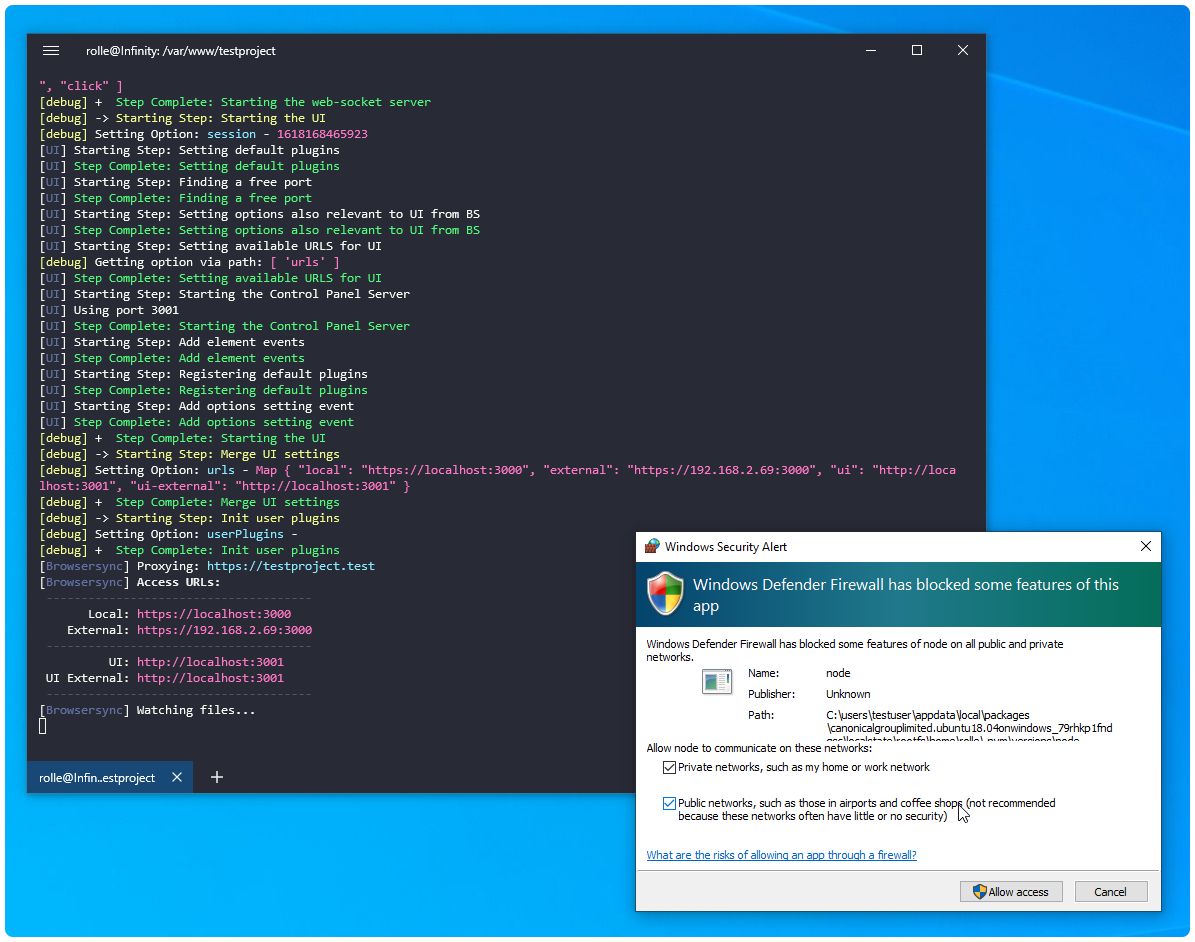
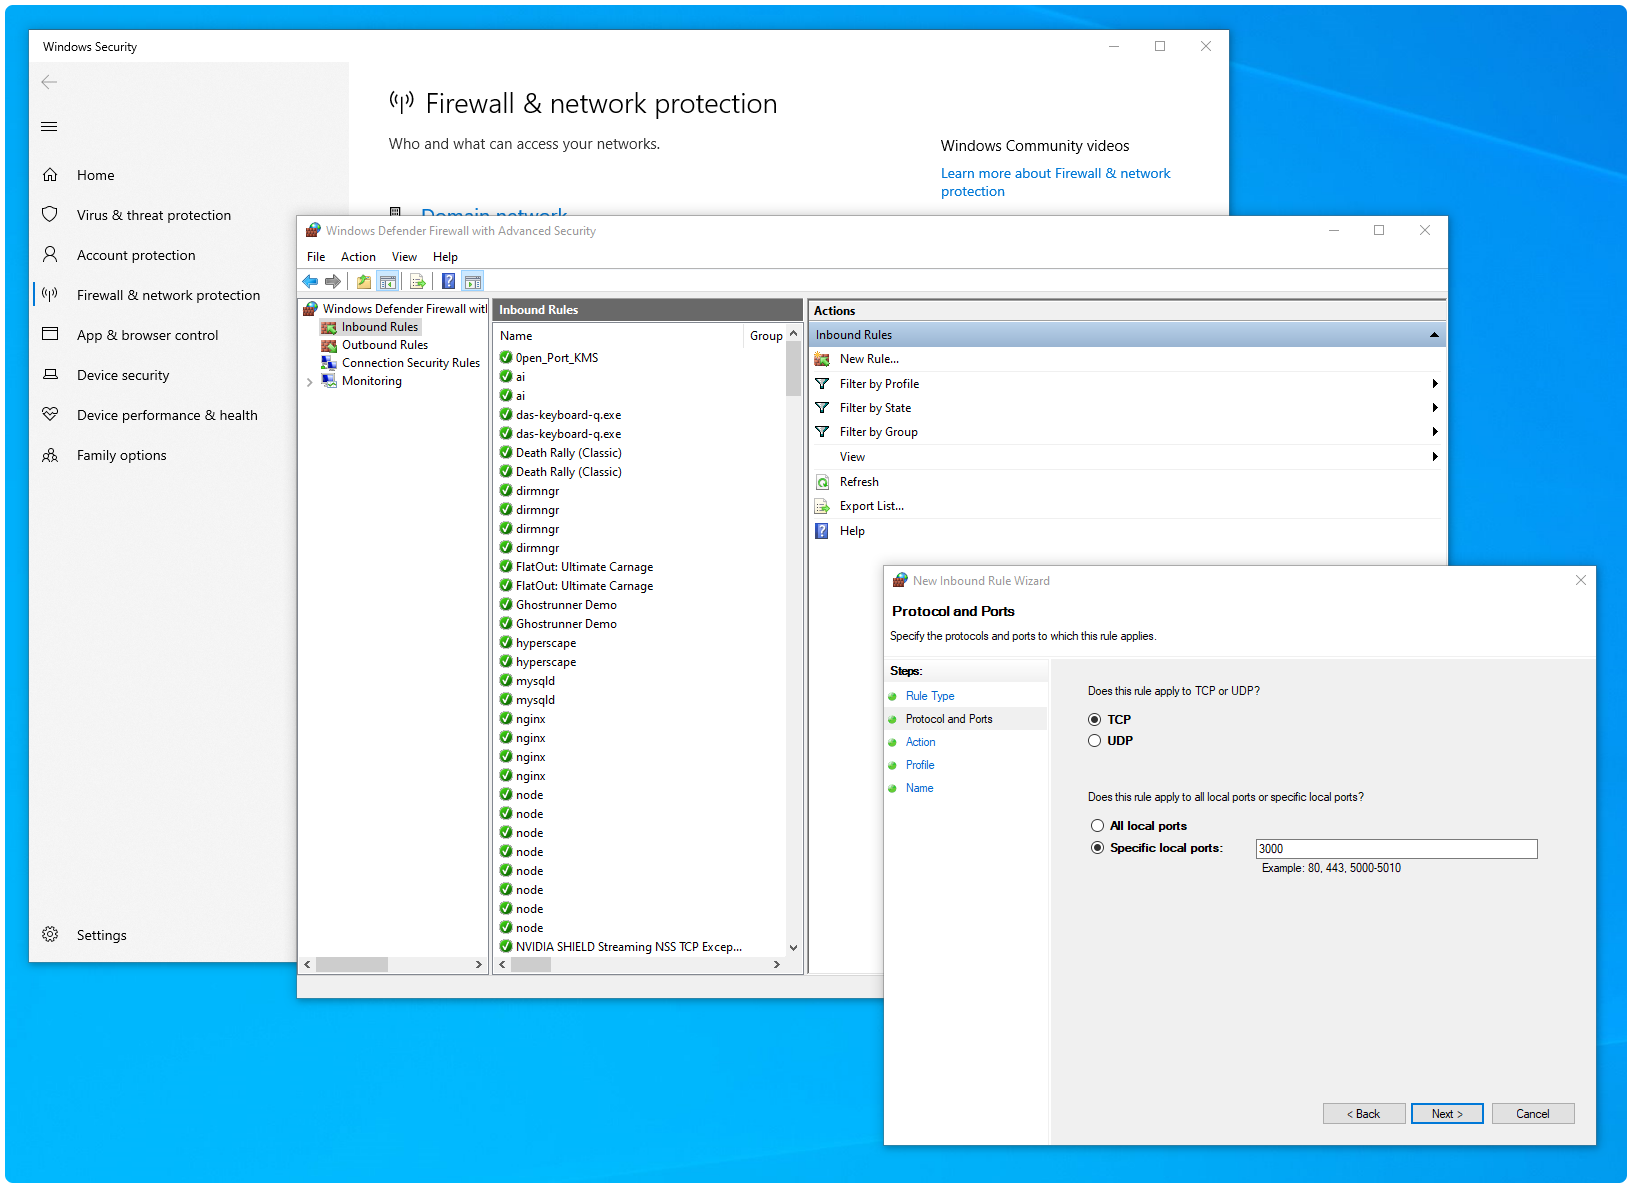
This is not enough though. You need to manually allow BrowserSync to run to be able to see changes in real time. So do following:
- Go to Start Menu, type firewall, click Firewall & network protection
- Click on Advanced Settings (small link second to last)
- Click on Inbound Rules on the left
- Click New Rule… on the right
- Select Port and Next >
- Select TCP, to Specific local ports: add 3000 and click Next >
- Select Allow the connection
- Select all three checkboxes, Domain, Private and Public and click Next >
- Add BrowserSync to the Name field and leave Description empty. Click Finish.
Stop gulp with ctrl + C and run it again. Open https://localhost:3000. Does it load up or not? It should, but remember this is Windows.
…bummer! For some reason for me localhost:3000 just loads up forever and decided not to use many hours on figuring out why. I did clear out that it’s not about SSL or ports, it’s about something else. I tried wsl.exe with PowerShell, cmd, Ubuntu 18.04, Git CMD (provided by a separate package Git for Windows) but none of them worked. Then I recalled the Node.js Command Prompt. See, there’s this many command line interfaces on Windows. Not fun.
So, install Node.js from nodejs.org. Go to start menu, type “node”, right click Node.js command prompt and select Run as administrator.
We need to reinstall npm packages for this different terminal because it will know those packages are for Linux and will throw an error otherwise (to be exact: “Error: Node Sass does not yet support your current environment: Windows 64-bit with Unsupported runtime (88)”). So jump back to FluentTerminal, then remove the node_modules folder by
cd /var/www/testproject
rm -rf node_modules
Then on Node.js command prompt:
cd C:\Users\Testuser\Projects\testproject
npm install
npm install gulp -g
Because we are now on Windows side, certs are not found in /var/www/certs, naturally. So let’s remove them from gulp/config.js (open it to your editor) so that the browsersync part of the config looks like this:
browsersync: {
  // Important! If src is wrong, styles will not inject to the browser
  src: [themeDir + 'css/**/*'],
  opts: {
    logLevel: 'debug',
    injectChanges: true,
    proxy: 'https://testproject.test',
    browser: 'Google Chrome',
    open: false,
    notify: true
  },
},
After this, finally run:
gulp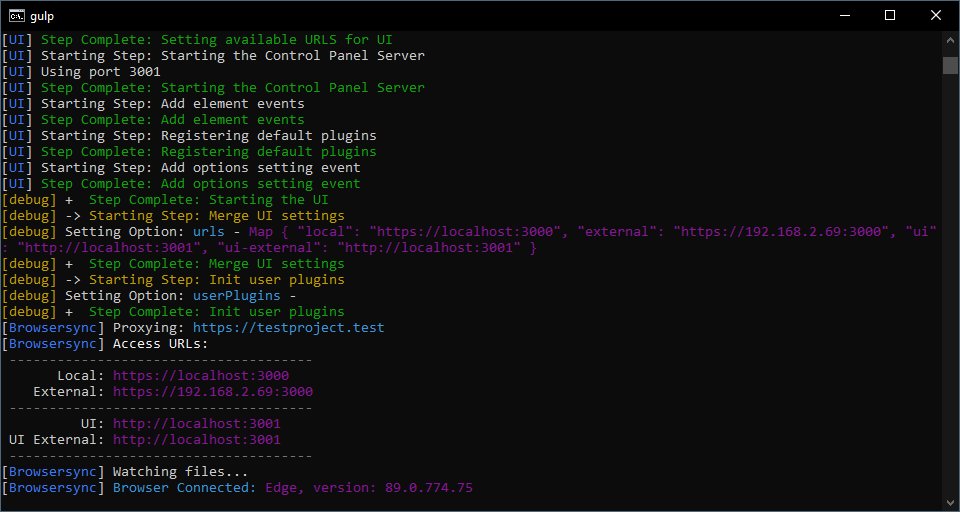
When you open https://localhost:3000 it should finally open in browser and BrowserSync instance should show you depending on what browser you are using:
[Browsersync] Browser Connected: Edge, version: 89.0.774.75Now you can test it out. Open for example global.scss and add CSS to the bottom:
body {
  border: 20px solid rebeccapurple;
  height: calc(100vh - 40px);
}
Save the file. You should instantly see the changes in your browser:

Yes, it’s a hassle. But now it’s done and you don’t have to do this again until you get a new PC or your hard drive breaks down. Then what?
Then just code! Please note there is no systemctl in Windows so services might not automatically start up after boot. If you see no websites loading up after reboot, just open the command line and start services one by one:
sudo service nginx start
sudo service php7.3-fpm start
sudo service mysql start
And we’re back in business!
What do you think? I sure spent my whole Sunday the 11th writing this. I lost my nerves couple of times because BrowserSync didn’t work and php-fpm stopped working because of wrong listen configuration (port 9000 instead of sock file). I even ran out of space because of too many npm packages. Again, this is Windows. Glad you got this far!
If you have feedback to the Windows development server, you can open the issue in windows-lemp-setup. If you know how to improve the WP stack or createproject-scripts, open an issue to dudestack. Air-light starter theme related should go to Air-light issue tracker.
If you really did read all this, please send me a feedback. Did it work for you?
Next up
Next time I could write about how we get sites to staging and production environment as easily and natively as possible. I also have my Visual Studio settings yet to cover. Bookmark this blog to find out more!